Posted
Filed under 프로그래밍
First we need to check free local disk space on XenServer:
 
# df -h
Filesystem            Size  Used Avail Use% Mounted on
/dev/sda1             4.0G  1.9G  1.9G  51% /
none                  373M  4.0K  373M   1% /dev/shm
/opt/xensource/packages/iso/XenCenter.iso
                       52M   52M     0 100% /var/xen/xc-install
#
 
You can clearly see there is not much disk space left on /dev/sda1.
 
Now you need to create a new Logical Volume (LV) that will have enough space for our ISO images.
 
First check the available physical disk space:
 
# pvs
  PV         VG                                                 Fmt  Attr PSize   PFree 
  /dev/sda3  VG_XenStorage-8eaf2053-79bc-3284-1b70-13a714db05eb lvm2 a-   457.75G 199.96G
#
 
Then check the Volume Group(s) (VG):
 
# vgs
  VG                                                 #PV #LV #SN Attr   VSize   VFree 
  VG_XenStorage-8eaf2053-79bc-3284-1b70-13a714db05eb   1   7   0 wz--n- 457.75G 199.96G
#
 
Then create the new LV in the available VG (I have only one):
 
# lvcreate -L 10G -n isoImages VG_XenStorage-8eaf2053-79bc-3284-1b70-13a714db05eb
 
Now you have to make a filesystem on this new LV. I've made mine ext3.
 
# mkfs.ext3 /dev/VG_XenStorage-8eaf2053-79bc-3284-1b70-13a714db05eb/isoImages
mke2fs 1.39 (29-May-2006)
Filesystem label=
OS type: Linux
Block size=4096 (log=2)
Fragment size=4096 (log=2)
1310720 inodes, 2621440 blocks
131072 blocks (5.00%) reserved for the super user
First data block=0
Maximum filesystem blocks=2684354560
80 block groups
32768 blocks per group, 32768 fragments per group
16384 inodes per group
Superblock backups stored on blocks:
        32768, 98304, 163840, 229376, 294912, 819200, 884736, 1605632
 
Writing inode tables: done                           
Creating journal (32768 blocks): done
Writing superblocks and filesystem accounting information: done
 
This filesystem will be automatically checked every 24 mounts or
180 days, whichever comes first.  Use tune2fs -c or -i to override.
#
 
Now you need to create a mount point:
 
# mkdir /mnt/isoImages
 
You need to make the LV in the VG known to the kernel:
 
# vgchange -a y
 
Create the repository:
 
# xe sr-create name-label=ISOimages type=iso device-config:location=/mnt/isoImages/ device-config:legacy_mode=true content-type=iso
 
You should see your new repository listed in XenServer:
 
# xe sr-list
 
uuid ( RO)                : 3f492136-d7ba-360e-8a83-c324be44a676
          name-label ( RW): ISOimages
    name-description ( RW):
                host ( RO): XenBelut
                type ( RO): iso
        content-type ( RO): iso
 
#
 
Now you can mount the new FS:
 
# mount /dev/VG_XenStorage-8eaf2053-79bc-3284-1b70-13a714db05eb/isoImages /mnt/isoImages/
 
You can modify the /etc/fstab file to mount the repository at boot.


http://komplog.blogspot.kr/2012/11/xenserver-61-create-local-iso-repository.html

2014/02/25 18:45 2014/02/25 18:45
Posted
Filed under 프로그래밍
nginx 에서 도메인명이 길거나 여러개의 도메인을 추가할때 

could not build the server_names_hash, you should increase server_names_hash_bucket_size: 32

이런 오류가 날때가 있는데

http {
       server_names_hash_bucket_size 64;

이거 추가해주고 재실행하면 해결된다.

2014/02/14 18:53 2014/02/14 18:53
Posted
Filed under 프로그래밍
server{
    listen 80;
    server_name example.com;
 
    access_log /home/path_to_site/access.log;
    error_log /home/path_to_site/error.log;
 
    location / {
        proxy_pass http://0.0.0.0:8002;
        proxy_set_header Host $host;
        proxy_set_header X-Real-IP $remote_addr;
        proxy_set_header X-Forwarded-For $proxy_add_x_forwarded_for;
    }
}

2014/02/12 16:21 2014/02/12 16:21
Posted
Filed under 프로그래밍/PHP
UTF-8로 된 CSV를 엑셀에서 불러오면 한글이 깨진다.

왜일까? 이유는...복잡하다.

그냥 파일의 맨 처음에 아래 한줄 넣어주면 잘 된다.

fputs($fp,"\xEF\xBB\xBF");


2014/01/23 18:28 2014/01/23 18:28
Posted
Filed under 프로그래밍
google,apple에 이어 통신3사(SKT,LGT,KT) 앱스토어에도 등록하기로 했다.
inapp 영수증을 서버에서 검증하지 못한다면 100% 뚤리게 되어있다.

그래서 각 사의 server-to-server 영수증 검증 관련 내용을 올린다.

SKT : 기본제공함.
LGT : 요청하면 메일로 보내줌 (1월달부터 공식 제공 예정이라고함).
KT : 요청하면 메일로 보내줌

기본적으로 제공해야하는것을 왜 요청해야 보내주는지 알수가 없다....


2013/12/17 15:06 2013/12/17 15:06
Posted
Filed under 프로그래밍
게임에서 사용하는 파일을들 CDN을 통해서 제공하다가 CDN사용료가 너무 많이 나오는 바람에
CDN처럼 사용할께 뭐가 있을까 하다가 찾아봤다.
어차피 nginx는 이미 사용하고 있던거고 해서..

참고로 이 방식은 Windows VISTA이후의 버전에서는 작동하지 않는다.
http://nginx.org/en/docs/windows.html#known_issues


http://wiki.nginx.org/ReverseProxyCachingExample

http {
    proxy_cache_path  /data/nginx/cache  levels=1:2    keys_zone=STATIC:10m
                                         inactive=24h  max_size=500m;
    server {
        location / {
            proxy_pass             http://1.2.3.4;
            proxy_set_header       Host $host;
            proxy_cache            STATIC;
            proxy_cache_valid      200  1d;
            proxy_cache_use_stale  error timeout invalid_header updating
                                   http_500 http_502 http_503 http_504;
        }
    }
}


keys_zone = 키를 저장할 공유 메모리 용량
inactive = 요청이 없을때 삭제할 시간
max_size = 캐시로 사용할 최대 디스크 용량


/data/nginx/cache 디렉토리를 메모리 디스크로 사용하고 싶다면

vi /etc/fstab 에서 아래 추가
tmpfs  /data/nginx/cache tmpfs size=500M    0       0

mount -a 하면 재부팅 하지 않아도 자동으로  마운트해준다.

제대로 작동한다면 아래와 같은 프로세스가 추가된다.

 root     18999  0.0  0.0  45536  1300 ?        Ss   Dec06   0:00 nginx: master process /usr/sbin/nginx www-data 19000  0.0  0.0  50088  7080 ?        S    Dec06   0:33  \_ nginx: worker process www-data 19001  0.0  0.0  50144  7080 ?        S    Dec06   0:33  \_ nginx: worker process www-data 19002  0.0  0.0  50112  7084 ?        S    Dec06   0:33  \_ nginx: worker process www-data 19003  0.0  0.0  50080  7080 ?        S    Dec06   0:34  \_ nginx: worker process www-data 19004  0.0  0.0  45732  1628 ?        S    Dec06   0:02  \_ nginx: cache manager process


http://kwonnam.pe.kr/wiki/nginx/proxy_cache
http://kilim.tistory.com/10
http://edendev.egloos.com/viewer/3257937
http://kray.jp/blog/nginx/
2013/12/06 14:27 2013/12/06 14:27
Posted
Filed under 프로그래밍
Ubuntu 기준 설명

http://munin-monitoring.org/


https://github.com/jnstq/munin-nginx-ubuntu


[Server]
apt-get install munin munin-node

* /etc/munin.conf

# a simple host tree
[web1.domain.com]
    address 127.0.0.1
    use_node_name yes
[web2.domain.com]
    address 1.2.3.5
    use_node_name yes

* NGINX 설정

server {
        listen 8000;
        server_name localhost:8000;
        location / {
                root /var/cache/munin/www;
        }
}


# Nginx status
server {
  listen 80;
  server_name localhost;
  location /nginx_status {
    stub_status on;
    access_log off;
    allow 127.0.0.1;
    deny all;
  }   
}

[Node - web2.domain.com]
apt-get install munin-node

* /etc/munin-node.conf
# Set this if the client doesn't report the correct hostname when
# telnetting to localhost, port 4949
#
host_name web2.domain.com

서버IP가 1.2.3.4 일때
allow ^1\.2\.3\.4$


[서버 임의 실행]
mumin을 설치하면 5분마다 돌도록 cron이 설정되어있음

su - munin --shell=/bin/bash
/usr/bin/munin-cron


[Plugin]
ln -s /usr/share/munin/plugins/nginx_request /etc/munin/plugins/
ln -s /usr/share/munin/plugins/nginx_status /etc/munin/plugins/

원하는 플러그인을 심볼릭 링크 걸어주고
service munin-node restart

2013/11/02 19:35 2013/11/02 19:35
Posted
Filed under 프로그래밍
IT 업종에 종사하다 보면 종종 듣는 용어들이 있습니다.
특히 게임에서 많이 사용하는 용어들을 몇개 골라 보았습니다.

우선 MAU(Monthly Activity User)를 보겠습니다.
MAU는 그 풀이대로 월별 활동 이용자를 뜻하며, 한달에 몇명이나 이 서비스를 이용하는가..아무래도 네트워크로 연계되는 사용자의 키를 기준으로 집계가 되겠습니다. 회원수랑은 좀 다르겠죠?

그리고 DAU(Daily Activity User)가 있습니다.
DAU는 일별 활동 이용자를 나타내는 것으로서 하루에 몇명이나 이 서비스를 이용하는가.. 그리고 이건 동접이랑은 좀 다릅니다. 

동접은 MCU(Maximum Current User)로서 순간 동시 접속자로서 실시간으로 바뀌는 성향이 있습니다. 동접이 높으면 그만큼 MAU랑 DAU가 높다는 뜻이겠죠?

그리고 평균 동시 접속자 수도 있을 텐데요.. 그건 ACU(Average Current User)라고 해서 평균 동시 접속 유저수라고 볼 수 있습니다.
2013/10/21 16:43 2013/10/21 16:43
Posted
Filed under 프로그래밍
SELECT
ERROR_CODE,
DATE_FORMAT( CREATE_DATE, '%m-%d' ),
COUNT(1)
FROM
TBL_NAME
WHERE
ERROR_CODE='E000'
GROUP BY
ERROR_CODE, DATE_FORMAT( CREATE_DATE, '%m-%d' )
2013/10/21 10:23 2013/10/21 10:23
Posted
Filed under 프로그래밍/PHP

* config/database.php 아래 추가

$db['pdo']['hostname'] = 'mysql:host=localhost;dbname=codeigniter';
$db['pdo']['username'] = 'codeigniter';
$db['pdo']['password'] = 'codeigniter';
$db['pdo']['database'] = 'codeigniter';
$db['pdo']['dbdriver'] = 'pdo';


* 사용하는 방법 (CI 그대로 사용)

//load the pdo db config
$this->pdo = $this->load->database('pdo', true);

//using the pdo config
$stmt = $this->pdo->query("SELECT * FROM users"); 
var_dump($stmt->result());

//using the pdo config with active record
$stmt = $this->pdo->get("users"); 
var_dump($stmt->result());


예제: http://codeigniter-kr.org/user_guide_2.1.0/database/examples.html

출처: http://codebyjeff.com/blog/2013/03/codeigniter-with-pdo

2013/10/15 18:36 2013/10/15 18:36
Posted
Filed under 프로그래밍

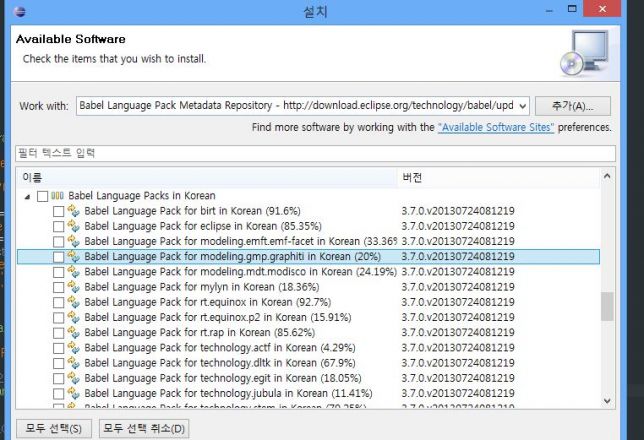
지금까지 나온 zend eclipse pdt 3.8 (all in one) 은 indigo 버전이다.

한글화를 해주는 babel프로젝트에서 다운받을때도 indigo 버전을 받으면 된다.

http://www.eclipse.org/babel/downloads.php
에서 최신버전을 url을 찾아

install new software 에서 설치하자.
http://download.eclipse.org/technology/babel/update-site/R0.11.0/indigo

사용자 삽입 이미지

2013/10/10 14:52 2013/10/10 14:52